Snapshots
A snapshot is a copy of data at a particular point in time.
Create
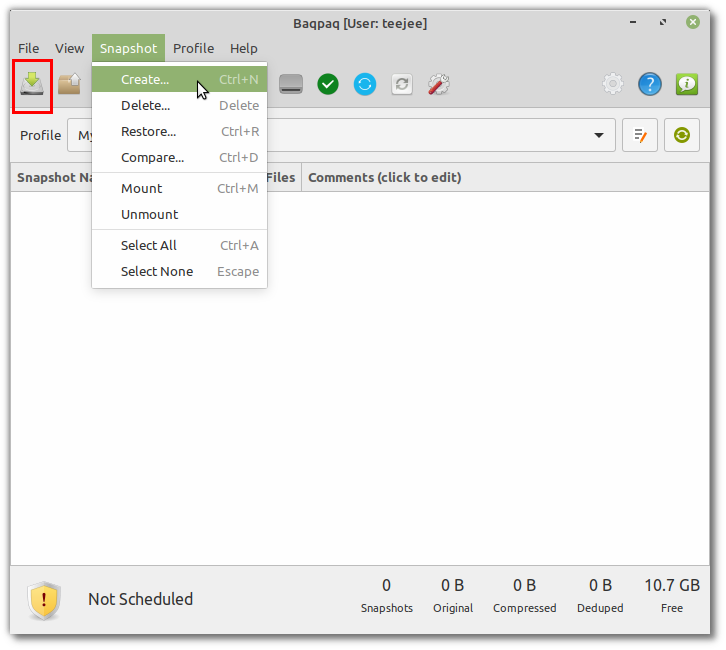
Snapshots can be created using the Create button in the toolbar. You can also press CTRL+N on your keyboard, or select the action from the menubar (Profile > Create).
Snapshots can be created using the Create button in the toolbar. You can also select the action from the file menu (FileMenu > Snapshot > Create), or press CTRL+N on your keyboard.
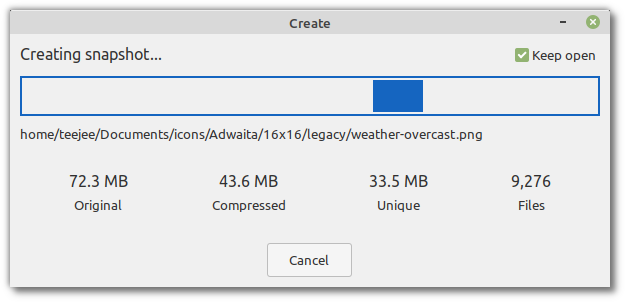
Progress is displayed in a progress window.
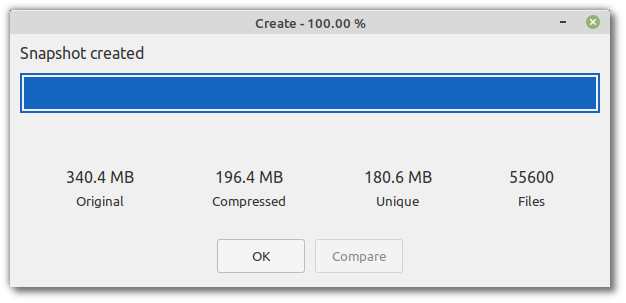
After the snapshot is created, click OK to return to the Main window, or click Compare to compare the new snapshot with the previous one.
In you prefer the default progress bar from your system theme, then select the option Use normal progressbars from the Settings window.
The progress window will close after the snapshot is created. Select the checkbox Keep open to keep the window open and view the final summary after the snapshot is created.
If you have any previous snapshots, the Compare button will be enabled. Click the button to view changes between the new snapshot and the previous one.
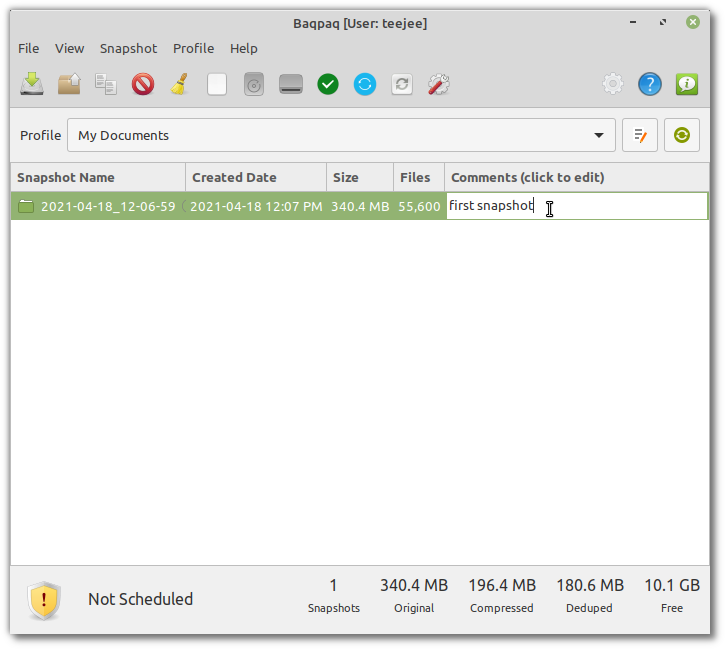
The new snapshot will be visible in the list of snapshots on the main window. Snapshots are listed in descending order with newest snapshot at the top.
You can click the Comments column to enter a comment. Commented snapshots are protected from removal by the Prune action which removes old snapshots. Commented snapshots will always be kept unless it is removed manually.
Notes
You can create a new snapshot using the toolbar button, or by enabling the scheduled task in profile settings, or by executing the command
baqpaq create -p <profilename>from a command window.
Tip
The create action can be cancelled or terminated at any time without issue. Changes are not committed to the repository till the action is complete.
Remove
Snapshots can be removed using the Remove button in the toolbar. You can also press DELETE on your keyboard, or select the action from the menubar (Profile > Delete).
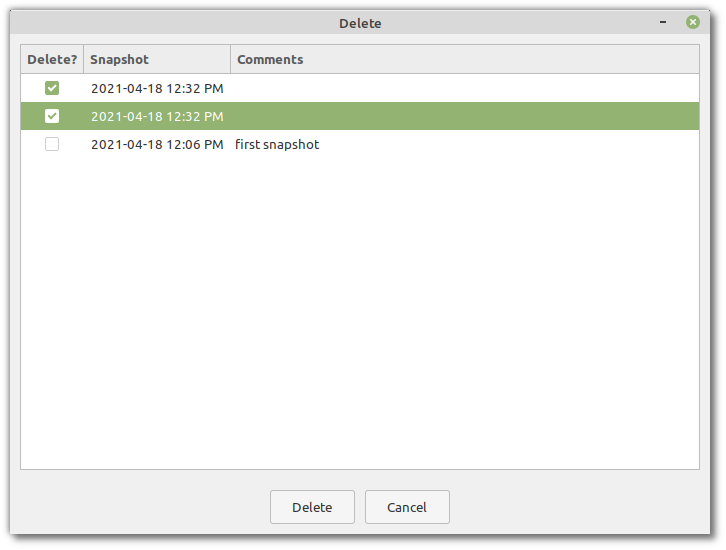
Comfirm the snapshots to remove and click Delete

Click OK to return to the Main Window.
Prune
Pruning backups will remove old snapshots based on the retention policy defined in profile settings. Click the button Edit Profile and go to section Prune.

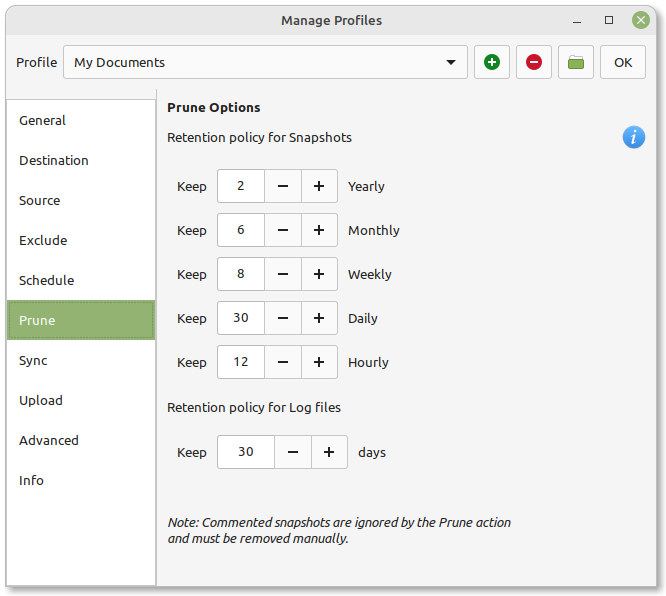
Select the number of snapshots to keep for each backup level, and click OK to return to the Main Window.
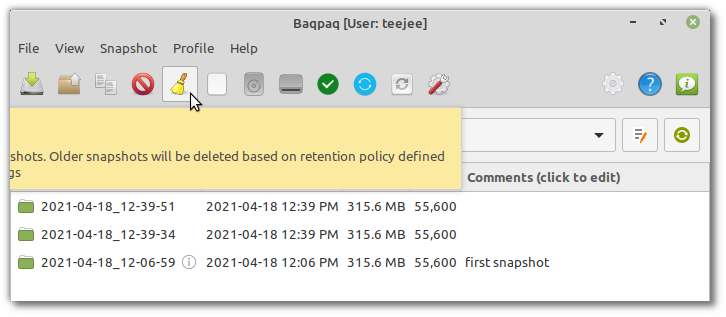
The profile can be pruned using the Prune button in the toolbar. You can also select the action from the menubar (Profile > Prune).
A list of snapshots will be displayed with Action as Keep or Delete based on the policy. Click the Prune button to execute the action.
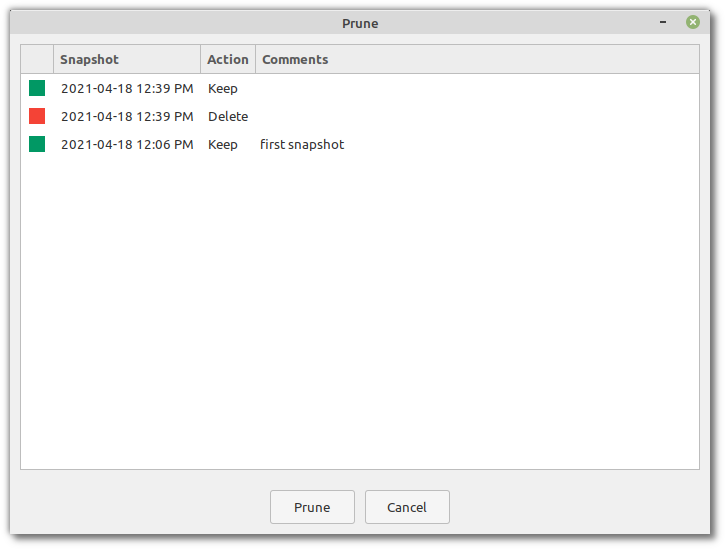
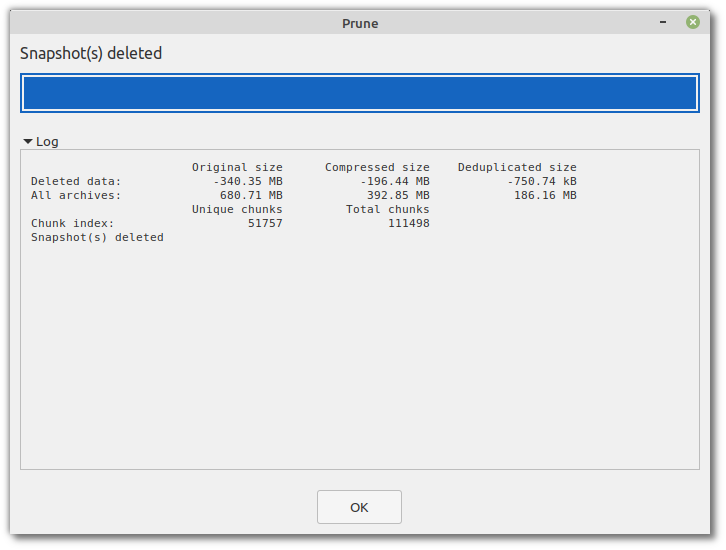
Click OK to return to the Main Window.
Snapshots not matching retention policy will be removed when profile is pruned.
You can prune the profile using the toolbar button, or by enabling the scheduled task in profile settings, or by executing the command
baqpaq prune -p <profilename>from a command window.
Tip
Keep less number of older snapshots and more number of newer snapshots. You are more likely to need a newer snapshot in case of an issue (if you accidentally delete a file for example).
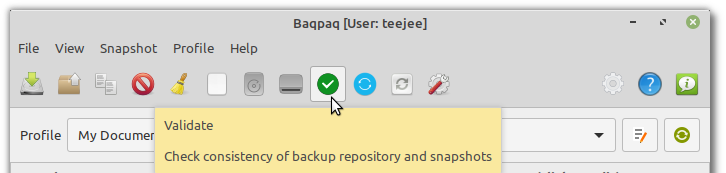
Validate
Snapshots can be checked for consistency using the Validate button in the toolbar. You can also press CTRL+SHIFT+V on your keyboard, or select the action from the menubar (Profile > Validate).
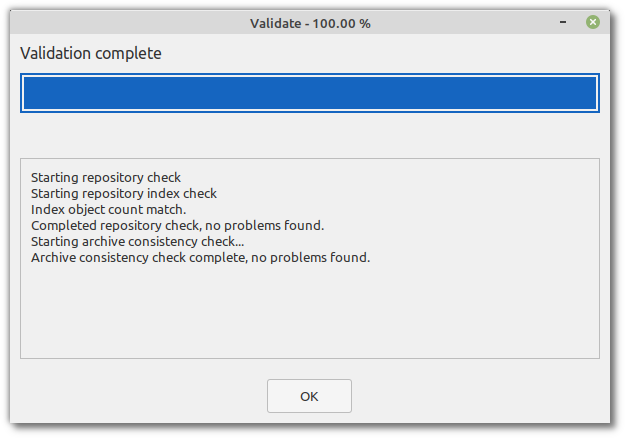
Data in backup repository will be checked for consistency. Click OK to return to the Main Window.
Notes:
Profile should be validated after moving the backups to a new location. It will check for data corruption and any other problems.
You can also run this action by running the command
baqpaq validate -p <profilename>from a command window.
Tip
Since this is a slow operation it is recommended to run this once a month as a scheduled task (Profile Settings > Schedule > Validate). It will run in the background at the scheduled time and you can check the logs later from the Log window.
Sync
Backups can be synced to a remote machine using Rsync, or to a path on the local file system. Open the Profile Settings window and go to the section for Sync.
Sync to Remote Machine
Backups can be synced to a remote machine on the local network. This is done using Rsync over SSH protocol. Rsync must be installed on the remote machine for this to work. Rsync copies data efficiently by comparing files on the remote machine, and transferring only new or modified data.

Host IP or Domain: Enter the host machine IP address (like
10.41.0.100) or domain name (likeyourdomain.com)Remote User: Enter remote user name. This should be a valid user on the remote machine. This user must have write access to the remote path on the remote machine.
Port: Enter port number. This is
22by default for SSH.Destination Path: Enter destination path on remote machine where backups will be saved. This can be an absolute path (starting with
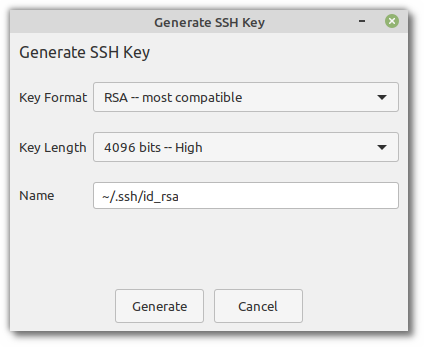
/) or a relative path (not starting with/). The remote user must have write access to this path on the remote machine. Relative paths are recommended since they are located in the remote user’s home directory where the user has write access.SSH Key: Select the SSH key to use for connecting to the remote machine, or leave it blank to try all available keys. Click the Add button to generate a new key.
Note
Password authentication is not supported since scheduled tasks need to run non-interactively. Set up public key authentication for the remote machine.
Tip
You can set a bandwidth limit for Rsync to limit the amount of bandwidth that is used by the app. For example, if your home network has a bandwidth of 20 MB/s you can set the limit to 15 MB/s to leave some bandwidth available.
Sync to Local Path
Backups can be synced to a path on the local machine using Rsync. Select [ Local Path ] from the drop-down and select the path where backups should be synced. If you are running Baqpaq with your own user account then you must have write access to this path.
Tip
Syncing backups to a local path is useful if you have a network share or cloud storage account that is mounted to a local path on your machine.

Upload
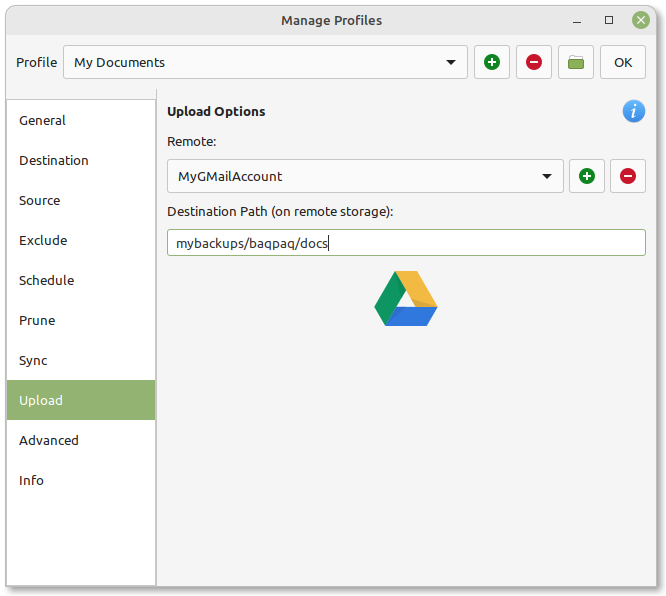
Backups can be uploaded to a cloud storage account using Rclone. Open the Profile Settings window and go to the section for Upload.
Creating Remote Connections
Rclone is a free and open-source tool for synching data to cloud storage accounts.
If you have any existing Rclone remotes, they will be listed in the dropdown.
If you are using Rclone for the first time, click the + button to add a new remote.
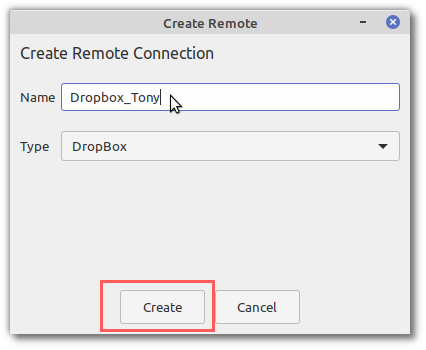
Enter a name for the remote connection and select the account type.
Note
Baqpaq provides an option to create connections for DropBox, Box, and Google Drive.
To create connections for other storage providers, run the command
rclone config in a command window and follow the prompts.
After the connection has been created, it will be visible in the drop-down
for selecting the destination.
Click Create to continue.
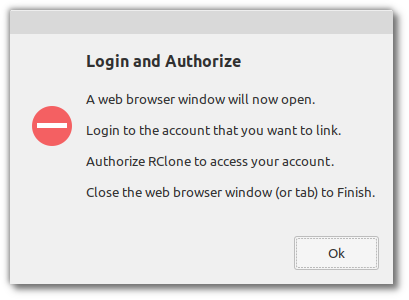
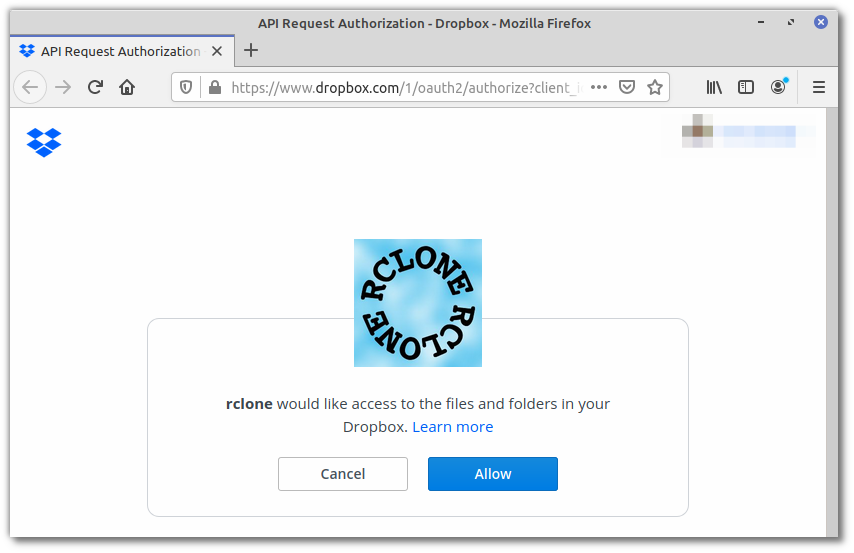

Close the web browser window (or Tab) and return to the Baqpaq window.
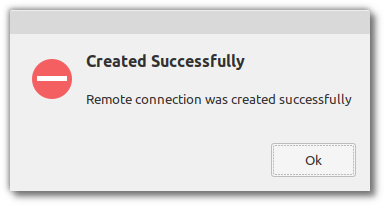
You will get a message if the connection was created successfully.
The new remote connection will be visible in dropdown. Select the connection and enter the path where backups will be uploaded. Click OK to save changes to profile and return to the Main window.
Note
If your web browser is already open, the authorization page may open in a new tab of your browser instead of opening in a new window. If this happens, go to the new tab in your web browser, authorize Rclone to access the account, and close the browser tab to finish.
Uploading Backups
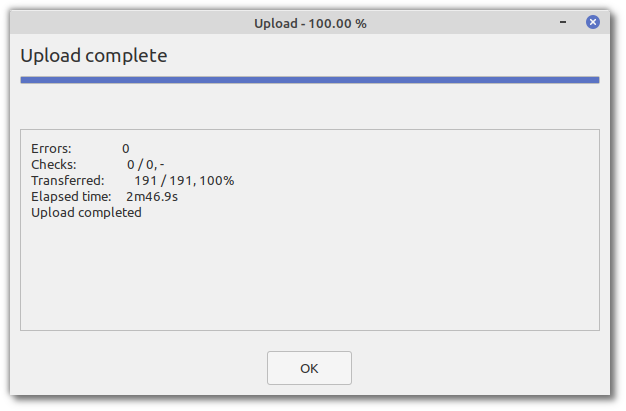
Backups can be uploaded by clicking the Upload button in the toolbar.
Wait for the upload to complete and click OK to return to the Main Window.
Notes
Rclone supports more than 40 cloud storage accounts. Run
rclone configin a command window to add, edit or delete remote connections. Refer to the Rclone documentation for more information.Profile will be in locked state while upload is in progress. Any scheduled tasks that run while the profile is locked will fail with an error.
You can upload the profile using the toolbar button, or by enabling the scheduled task in profile settings, or by executing the
baqpaq uploadcommand from a command window.
Note
Uploading backups will sync the contents of backup directory
to a sub-folder in the destination path (<destination-path>/<profile-id>).
Extra files in the sub-folder will be deleted.
This sub-folder is created for safety, to avoid any accidental deletion of existing files in the destination path.
Mount
Baqpaq uses BorgBackup as the storage backend. Borg stores the files in a opaque format in a data repository. To view the files and folders inside the repository, it needs to be mounted to a temporary path.
Double-click any snapshot in the list to mount the snapshot and browse the contents in a file manager.
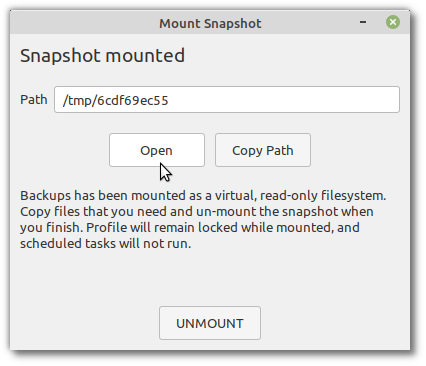

Copy any files and folders that you need and unmount the snapshot when you finish. Click the Unmount button to unmount the snapshot and return to the Main Window.
Note
The filesystem mounted in the temporary folder is virtual and read-only. The contents cannot be modified.
Caution
The profile will be in a locked state while snapshots are mounted. Scheduled tasks will fail if it runs while the profile is locked.
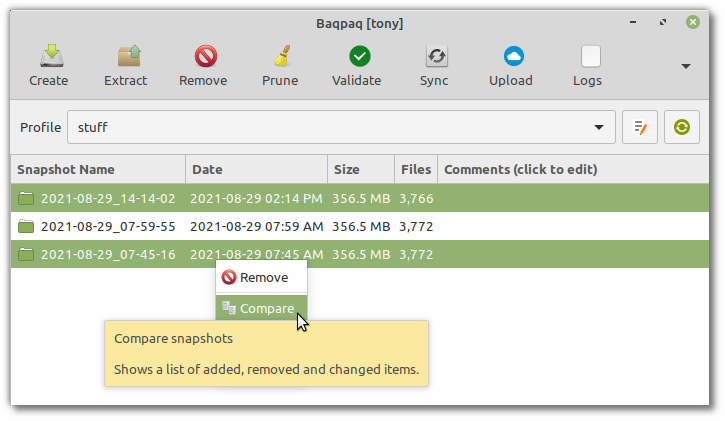
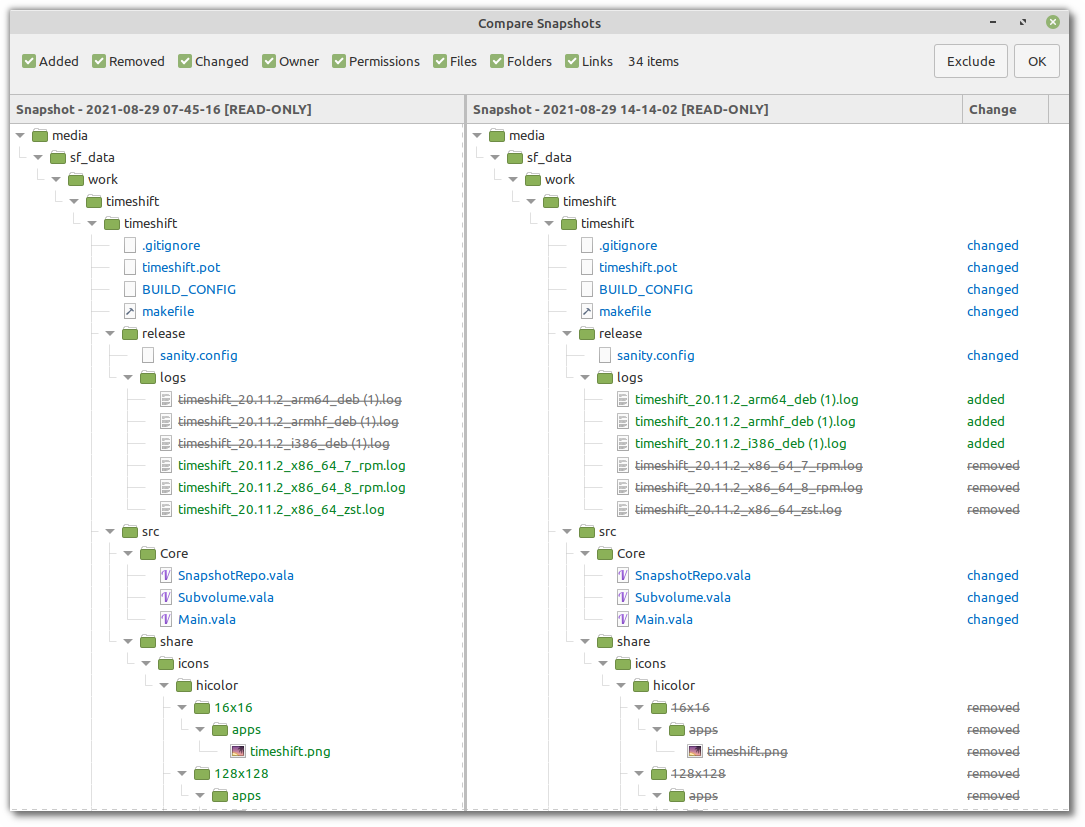
Compare
To compare any two snapshots, select the snapshots in the list, right-click, and select Compare.
Changes between the 2 snapshots will be displayed in a 2-pane tree view. The older snapshot is displayed on the left-hand side, and newer snapshot on the right-hand side.
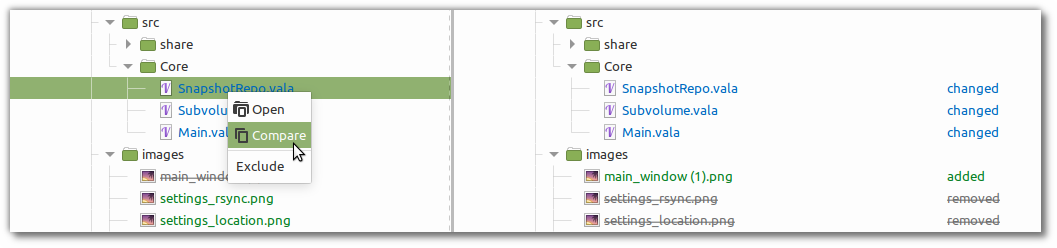
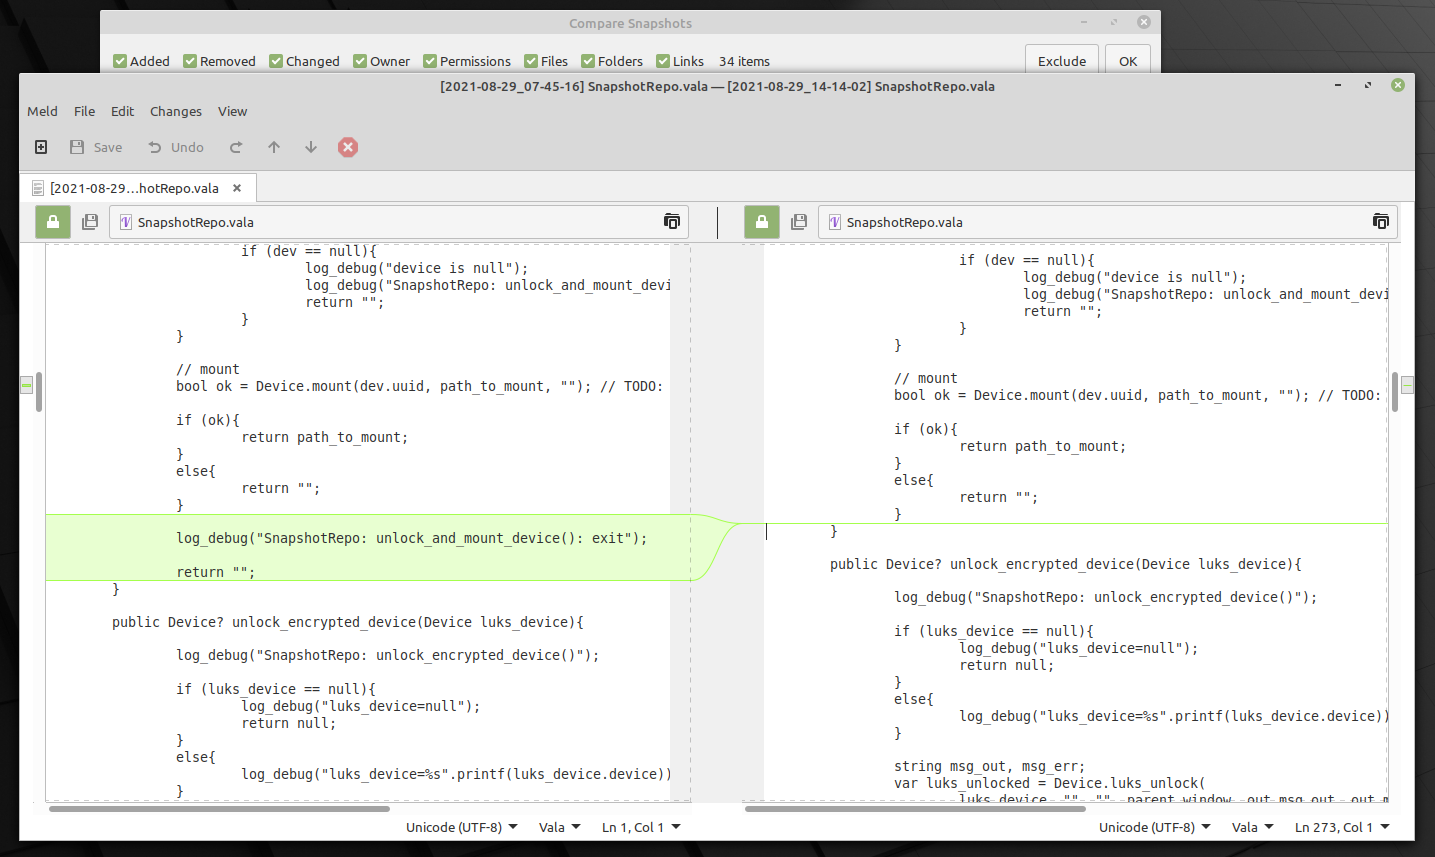
Compare changes in text files
To compare changes in text files, right-click the file and select Compare. This will open the file in a text comparison tool like Meld, Diffuse, or Beyond Compare.
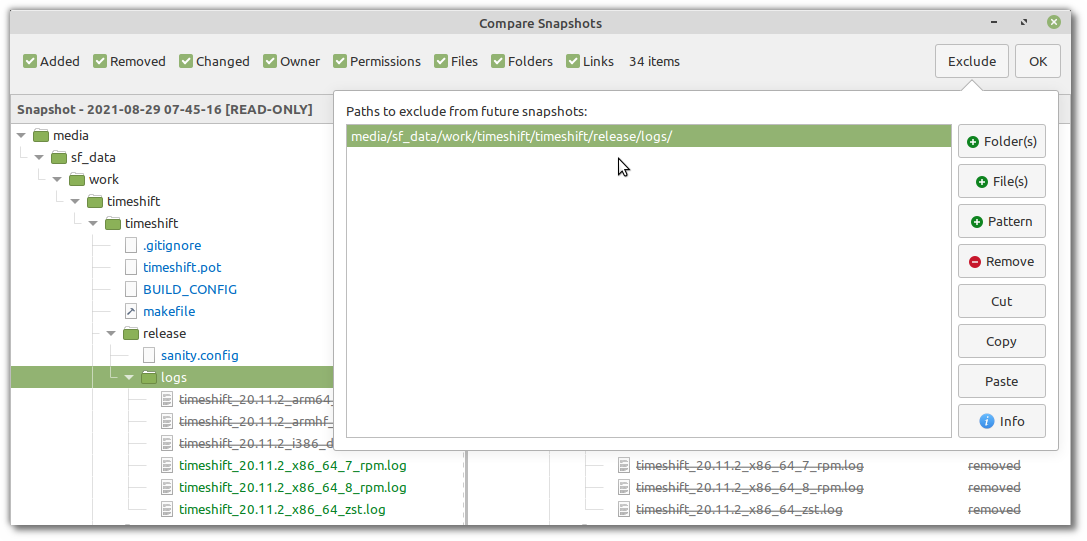
Exclude items from future snapshots
To exclude an item from future snapshots, right-click the file or folder and select Exclude. This will add the path to the list of Exclude filters for the profile.
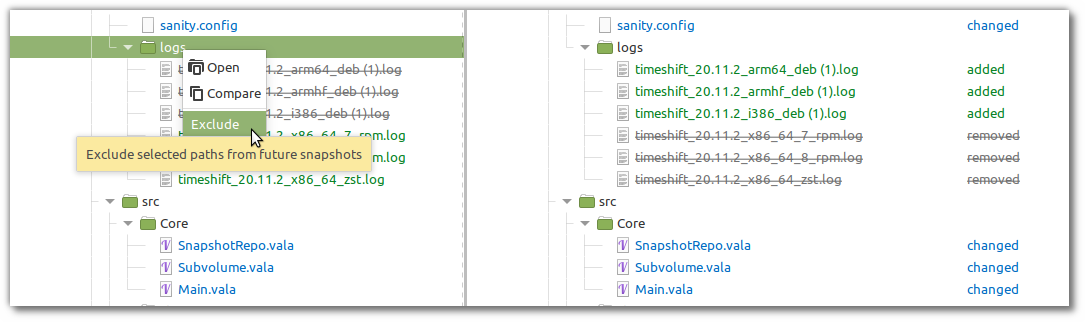
Click the Exclude button in the top-right to view and edit the list of Exclude filters for the profile.
Caution
The selected snapshots will be mounted for comparing the contents. The profile will be in a locked state while snapshots are mounted. Scheduled tasks will fail if it runs while the profile is locked.
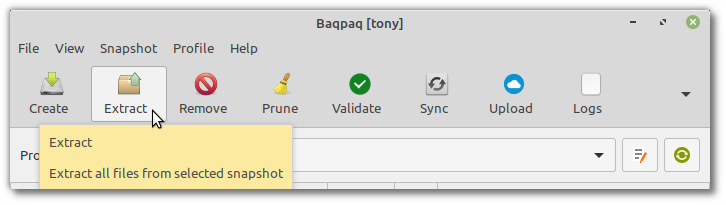
Extract
To extract the contents of a snapshot click the Extract button in the toolbar. You can also press CTRL+E on your keyboard, or select the action from menubar (Snapshot > Extract).
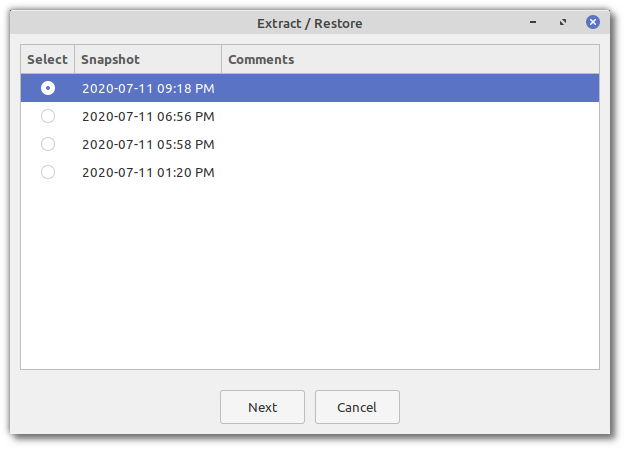
Select a single snapshot to extract.
Extract to new path (Recommended)
Select the path where snapshot will be extracted. It is recommended to extract files to a new folder instead of restoring to original paths.

Extract to original path
You can also extract files to their original path. Existing files and folders will be replaced without warning. Extra files in the original path that are not in the snapshot will not be deleted.
Caution
Please use this option at your own risk. Existing files will be replaced with older files from the snapshot.
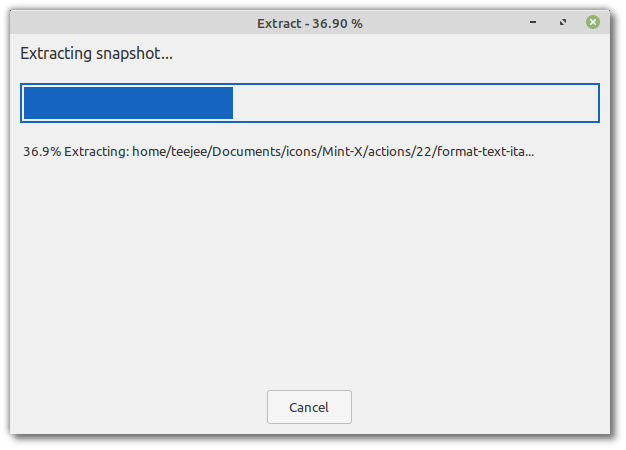
Click ‘Extract’ to extract the snapshot.
Schedule
Scheduled tasks can be created for a profile from the profile settings. Click the button Edit Profile and go to section Schedule .
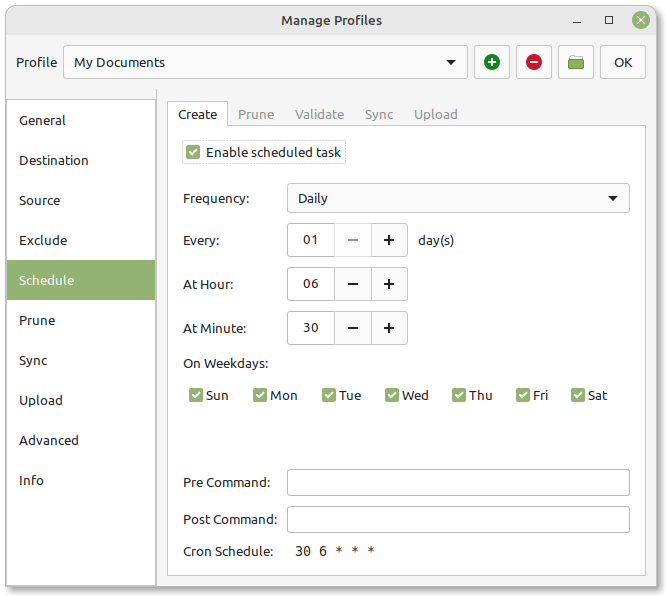
Select the action for which you wish to create a task. For example, select the “Create” tab for creating a snapshot at a scheduled time.
Click the switch for “Enable scheduled task”.
Select the time (or frequency) when the task should run.
(Optional) Enter the command (or shell script) to run before the snapshot is created
(Optional) Enter the command (or shell script) to run after the snapshot is created
Examples
Some examples are given below.
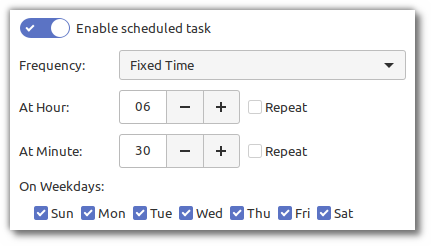
Daily at 6:30 AM, on weekdays (Monday to Friday)
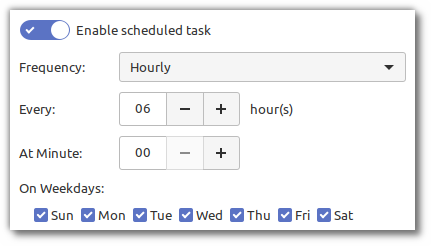
Hourly, every 6 hours, every day of the week (At 12am, 6am, 12pm, 6pm):
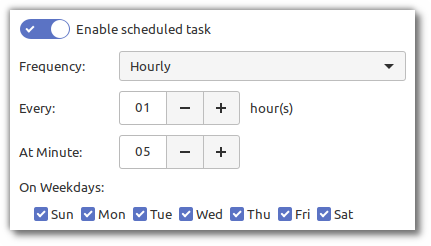
Hourly, at the 5th minute, every day of the week:
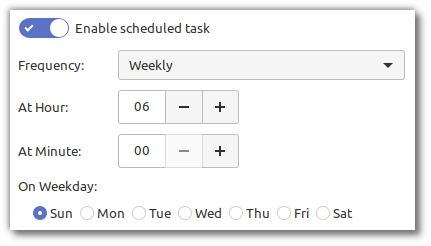
Weekly at 6:00 AM, on Sunday:
Monthly at 8:00 PM, on the 10th of every month:

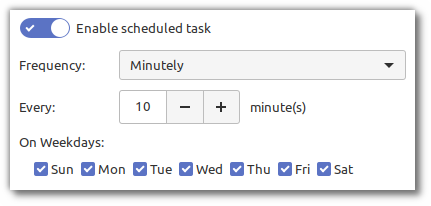
Every 10 minutes, every day of the week:
Tip
Snapshots can be created as freqently as needed. If the files have not changed, the extra snapshots will not use any disk space.
Custom Schedules
Scheduled tasks are created with cron.
You can create your own cron jobs or systemd timers by calling baqpaq on the command line.
For example,
# create
baqpaq create -p "My Documents" --batch

# prune
baqpaq prune -p "My Documents" --batch

# validate
baqpaq check -p "My Documents" --batch

# sync
baqpaq sync -p "My Documents" --batch

# upload
baqpaq upload -p "My Documents" --batch
Tip
Tasks that are scheduled from the GUI are scheduled using Cron, for compatibility with all Linux distributions (even those distributions that don’t use SystemD). If you wish to use SystemD timers, disable the tasks in the GUI, and create SystemD units for the actions that you want to execute.
Tip
Pass the --batch option to Baqpaq when you execute it from a script.
This will disable any interactive prompts and progress bars.